

( previous blog, first blog of the series )
5. Framing
The last day of September was sunny. I went to a local building material shop to purchase pressure-treated lumber. The shop delivered the lumber the same day. Because of the recent rain the ground of our backyard was soft, and the delivering truck made many deep ruts in the backyard. That night it rained again, and our backyard looked like that the next morning. Pity!
The lumber was also scattered in the backyard.
It would take some time to finish framing, and, since most pressure-treated lumber is not rated for ground contact, it was not good for it to have dirt stuck to it for long. So, I washed the dirt off the lumber and racked it to keep it from touching the ground.
While I was purchasing lumber, I also purchased construction items from different stores. Following was some of the items.
Following is the two ends of a 20-foot-long plastic tube with water inside. It was used to mark heights. In order to easily see the water level from a distance, I added a few drops of soy sauce in the water.
The next step was to install posts and beams. 
The first to be installed were Beam A and D. All beams were made of 3 pieces of 2 x 10 boards (actual size 1.5 x 9.5 inches), fastened together by wooden screws on both sides. Because Beam A and D were close to the house wall, they had to be fastened together first then put on posts, otherwise, there would be no space for me to put screws in after the boards were on posts. But I could not lift a 3 board beam by myself, so I asked a strong friend to help during weekends.
Saturday the friend came over as did our neighbor Mike. When I was digging holes, Mike often came to visit, he always thought it unbelievable that I was doing it myself. Now, he had to take his tool bags and come to help. With more people, the job became easier. The two beams were installed in that day. 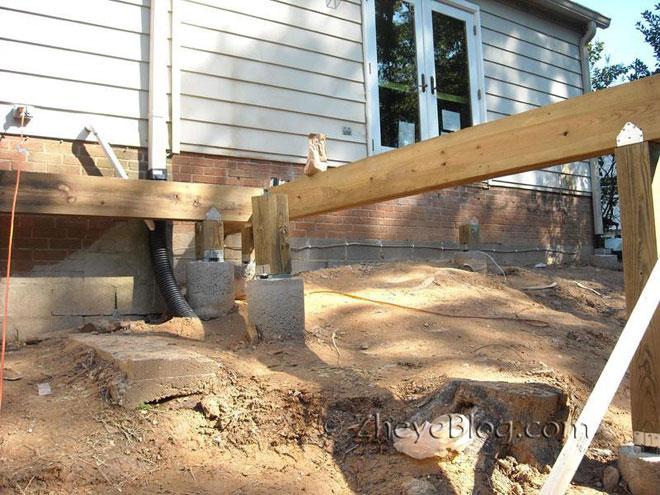
When the first beam was installed Mike put a level on the beam, saw the bubble was in the middle, and said, jokingly, “Not bad for an amateur.” I said to myself, when I was teaching physics lab at a university in China the precision requirement was much higher.
The posts were fastened to post bases, and the bases were bolted to the J-bolts buried in the concrete footings. Beams were fastened to posts by post caps. 
Sunday, the friend came again and helped to install two more beams. 

Each newly installed long posts had two braces to support on ground.
Monday the friend needed to go to work, so I was back at work alone again. The following two photos show how to use the 20-foot-long plastic tube to ensure the identical height of two objects. 

Look at the water levels in the red circles in the above picture. Adjust the right end of the tube up or down to let the water level in the left end is at the desired height, then mark the location of the water level in the right end on the post. The post in the right side of the picture was put on the post base, which was not nailed yet. After making the mark, I took the post down and cut it with miter saw. When installed, the top of this post was at the same horizontal plane as the tops of other installed posts.
When installing the last two beams, I asked the Boss to help to move boards one by one onto the top of posts, then I screwed the boards together. All beams were installed.

Beams were made of 3 pieces of lumber. There were always differences between them because the boards tend to curve or twist. When put together, not all the boards were lined up. In this case, I used a plane to even them.

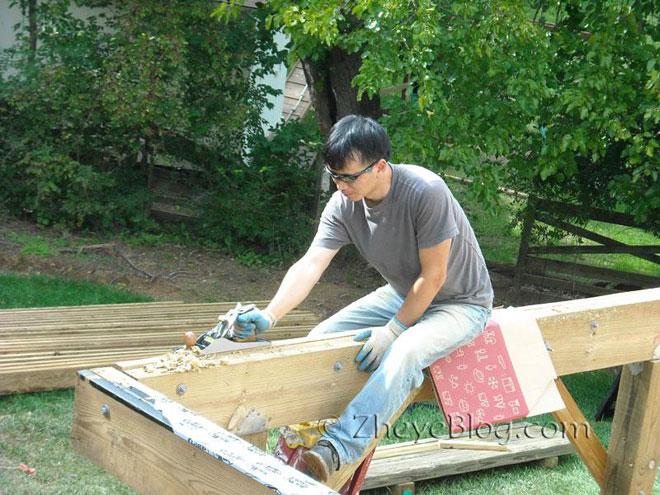
After planing.
The objects inside the red circles in picture above are half inch diameter bolts. Those bolts were used to reinforce the beams, and, when the boards were not lined-up well, the bolts drew them together.
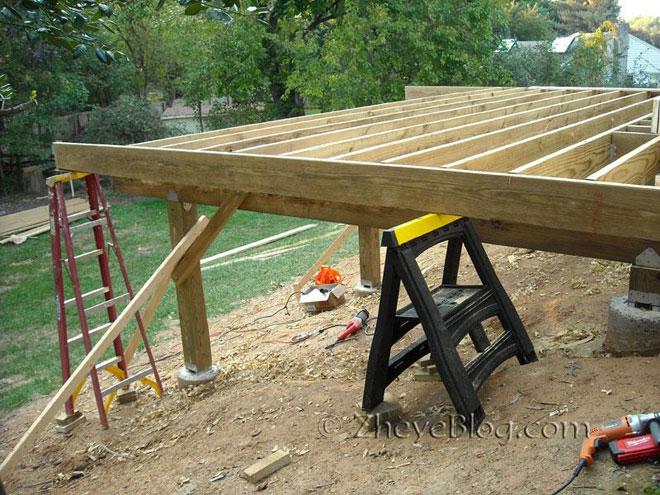
Followed the deck-building books I put 6-inch-wide self-adhesive waterproof membranes on top of each beam. The membranes prevent water from getting in the gaps between boards. Later, I found another big benefit of the membranes. The plastic outside layer of membranes made it easy to slide the joists around on top of the beams. It saved me a lot of labor.
The photo above was taken by the Boss. I did not know the photo was taken since I was busy cutting lumber. The 20-foot-long boards were cut into 18.5 feet in length, then I lifted them onto the beams by myself. Later the Boss helped me to lift joists onto the beams which made the process go faster.
After joists were put on beams, I fastened them to beams with hurricane-ties. One joist needs five hurricane-ties, and one hurricane-tie needs 4 #8 long nails and 6 #8 short nails. With a total of 22 joists, I needed to hammer in over 1,000 nails!
When I started to install the joists, I realized that many things I took for granted when designing the deck were not true in reality. The wall next to the deck were not straight, the corner of the house were not exactly 90 degrees. Because of that, I had to remove the first joist and refasten it, and all the marks on beams for joists had to be redone. Luckily, the training when I taught physics lab prepared me for this, so it did not take long for me to re-do the marks.
The right side of the following picture shows 4 installed joists; the left side were joists waiting to be installed.
Then install joists for a step on the top of the four finished joists. 
Finished joists for the step.


It seemed there were many redundant parts for the step, but they were needed for the deck pattern.
Up to this point, all joists could be laid on top of the beams and then be installed. But the rim joist would not have beams for support. So, using a ladder and a sawhorse to support the rim joist, I was able to install the rim joist by myself.
Finished rim joist with railing posts installed.
A corner of the deck frame.
The entire views of the deck frame in construction.

The ten 60-pound bags of concrete mix on ground were for stair landing concrete pad.
The wood pieces cut off from posts were perfect for padding ladder on the slope.

On the other side of the deck the joists were installed first, then cut.

After cutting.
Actually, it was much easier to cut first, then lay on top of the beams and then install them.
At the end of those joists, there was to be a rim joist, but this time the ladder was not high enough. So, how was I to install the rim joist without help? To resolve that, I made a frame with scrap lumber.
Then attached the frame to rim joist with screws.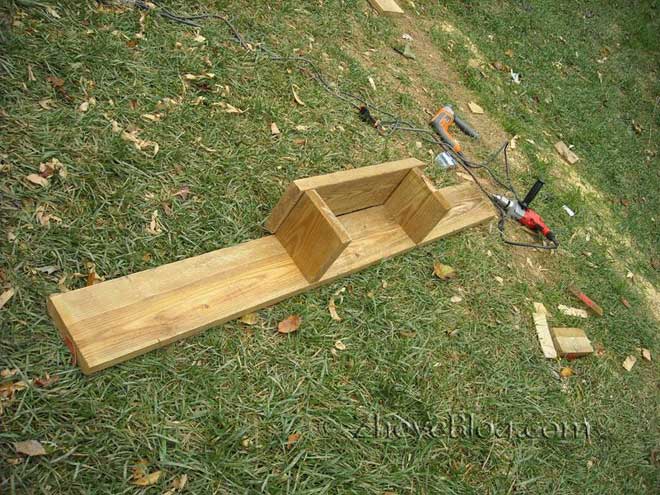
Then I hung the entire assembly over the end of those joists. After the rim joist was installed I unscrew to remove the frame.

Weather forecast again predicted rain. I decided I better to finish the stair landing concrete pad. First, I measured and marked the location, then dug out dirt to the desired depth and placed the pad mold into position. I laid a layer of rock at the bottom.
At dusk I mixed and poured ten 60-pound bags of concrete mix into the pad mold to a thickness of 6 inches. Then it started to rain heavily. The following picture was taken the next day after rain stopped.
The concrete pad after the mold removed.
This side of deck was higher, and our ladder was not high enough.
So, I borrowed an extension ladder from our neighbor Mike.
My younger son took a picture of me standing on the ladder and nailing.
The connection between deck and stairs.
Cut a 2 x 12 board into a stair stringer.
Attached four stair stringers to the deck.
The bottom of stringers were fastened to the concrete pad. This was done by drilling on the concrete pad with a hammer drill.
Next step was to finish corners.
Used F-clamps to hold the board, then screwed the board in place.
Another corner.
After finished corners, the frame was basically finished, and ready for county inspection.


Early on the morning of November 6th, I was having breakfast when I looked out the window and saw someone walking on the deck frame. Realizing it was the inspector, I went out to meet him. He said my deck had followed the Details exactly, and, should the house ever collapse he was sure the deck would still be standing. I asked if there were people who do not follow the Details? He told me most people comply with the Details, but some do not. In my case the deck framing was in precise compliance and it passed the County inspection.
( next blog )